Import Application Security Data
After an application has been added, the application security data (users, permissions, etc.) for that application needs to be imported. Security data should be also updated/imported before each review to ensure the most recent user and permission information is included in the review. Data can either be imported immediately, or it can be scheduled to automatically import at a specific day/time.
Import Data Immediately
To import data, complete the following steps:
-
From the Applications list, select the application for which you want to import data. The Applications Details page appears with the Imports tab already selected.
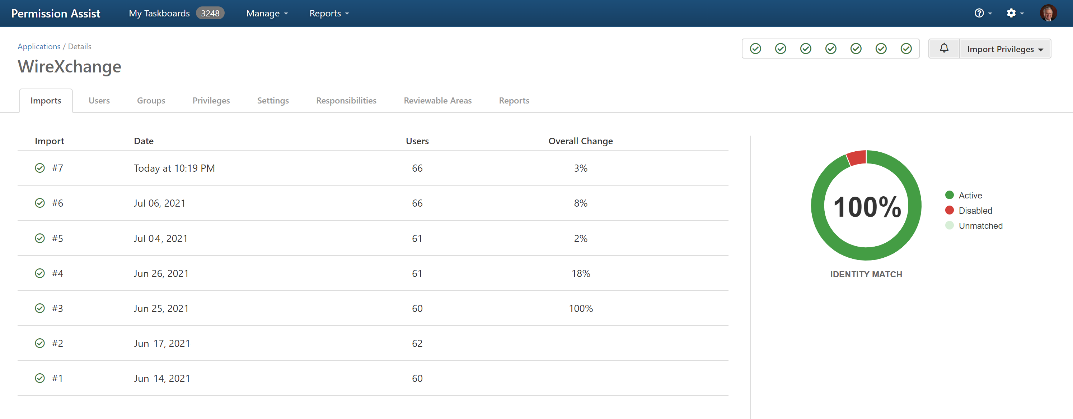
If this is the first import for this application, the Imports tab will be blank. After an import has been completed, the Imports tab allows you to quickly see a summarized list of each import along with the date, the number of users added/changed, and the overall percentage of change when the import took place (see example below).
-
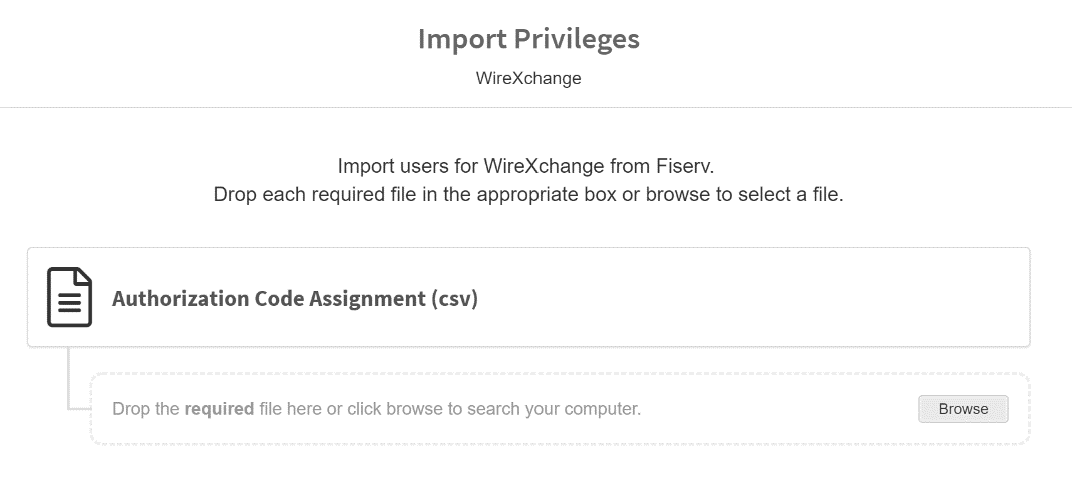
Select the Import Privileges button in the upper, right corner of the page and select Import Now. The Import Privileges page appears (see picture below).
-
Select the Browse button to search for and select the required file.
-
Permission Assist does some preliminary verification of the file to help ensure the correct file is being loaded (the specific checks done on each file vary depending on the application and the file being uploaded). If the file passes the first set of verification checks, the box appears green. If the file doesn't meet the criteria needed, the box appears red indicating the file may not be the correct file.
-
You can also select the file in another window and drag it into the box shown below the report name.
-
-
When all required files are successfully uploaded, select the Update button. The import data is loaded in the background.
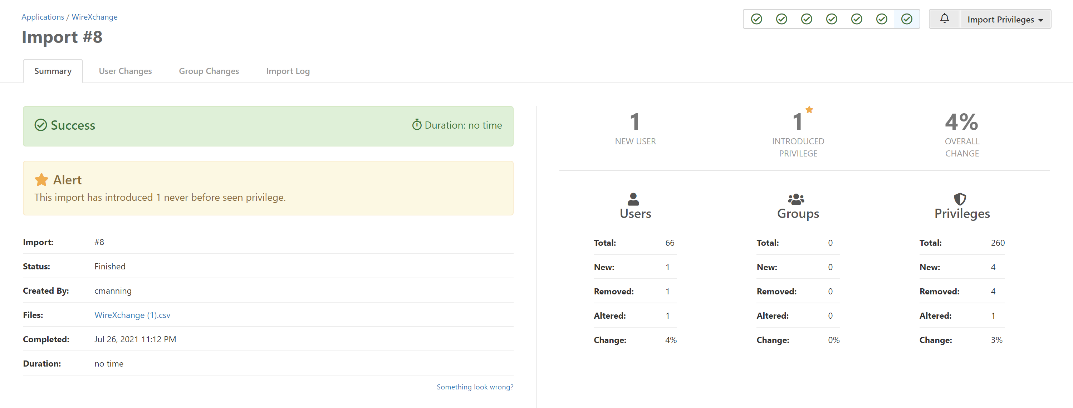
During the import, the system does a preliminary analysis of the data being imported. If the import is successful, the Import Details page is displayed (see picture below) displaying a summary of the import including the number of new users, new privileges, and an overall percentage of change after the import.If an import results in changes that go outside of the trend for that application (say for example an unusually large number of new users or new privileges are detected), the import is paused and you'll have the option to continue or cancel.
Schedule Automatic Imports
Automatic imports allow you set a scheduled time for Permission Assist to automatically import data for you. All you need to do is have the import files saved to a specific folder (either on the server or within a network folder that the server has access to), tell Permission Assist where the files are located, and then set the import schedule. Files will be automatically imported on the day and time specified.
Permission Assist only allows automatic imports from locations that have been pre-approved by a Permission Assist administrator. Before scheduling automatic imports, the System Configuration > Applications > Imports area must be set up to ensure Permission Assist has access to the correct location of the import files.
To schedule automatic imports, complete the following steps:
-
From the Applications list, select the application for which you want to import data. The Applications Details page appears with the Imports tab already selected.
-
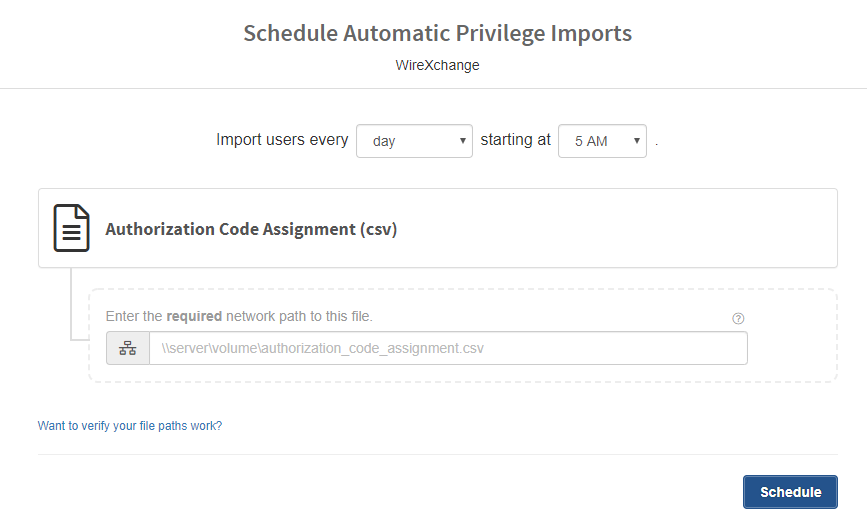
Select the Import Privileges button in the top right corner of the page and select Schedule Automatic Imports. The Schedule Automatic Privilege Imports page appears (see picture below).
-
Enter information into each field as follows:
Field
Description
Import users every [day]
Used to determine how often data will be imported. By default, this field is set to "day" which means that information will be imported daily at the "starting at" time.
To change the import frequency:
-
Select the "day" field and pick a new option from the list.
Starting at [5am]
Select the time of day you want the import to occur. By default, this field is set to "5am."
To change the time of day the import is started:
-
Select the "5am" field and pick a new time from the list.
Enter the required network path to this file
Enter the location and name of the file (ex. F:\ImportData\VendorName\ProductName\UserPermissionReport.xlsx)
To test that the path and file name are working, select the Want to verify your file paths work? link. If Permission Assist is able to locate the file and the file is accessible (meaning the service account has permissions to access the file) the following message is displayed:

If Permission Assist is not able to locate or access the file, a message is displayed with a description similar to the example shown below:

-
-
Select the Schedule button. A success message is displayed in the upper, right corner of the page indicating that the imports are successfully scheduled to occur on a regular basis. When the success message is closed, the date and time of the next scheduled import appears in the upper, right corner of the page similar to the following:

View Detailed Import Information
The import details page allows you to view detailed information about each import. This page is also displayed after application data is imported.
To view detailed import information, complete the following steps:
-
From the Applications list, select the application for which you want to import data. The Applications Details page appears with the Imports tab already selected.
-
Select the import for which you want to see more detailed information. The import details page appears allowing you to view the following information within each of the following tabs:
View an Import Summary
The Summary tab provides detailed information related to the import (see picture below). The left side of this tab is used to show import details such as the status, the file used to import data, and the date the import was completed. If an import results in new privileges, an alert message is displayed.
The right side of this tab summarizes the changes that occurred during the import such as the number of new users, the number of new privileges, and the overall percentage of change. For a detailed list of the additions and changes select the User Changelog tab or Group Changelog tab.
Selecting the file name link allows you to download a copy of the exact file used to import data.
View the User Changelog (User Changes Tab)
The User Changes tab allows you to see a list of all users that have been added or changed as a result of new data being imported. If you've assigned risk ratings to permissions within the application, the Risk Elevation column indicates whether the import resulted in privilege changes that elevated risk.
To see a detailed view of the user's privileges as compared to a previous import, select the user within the list (see picture below). The details panel displays the user's privileges before the import (the Was column) and after the import (the column with the import number).
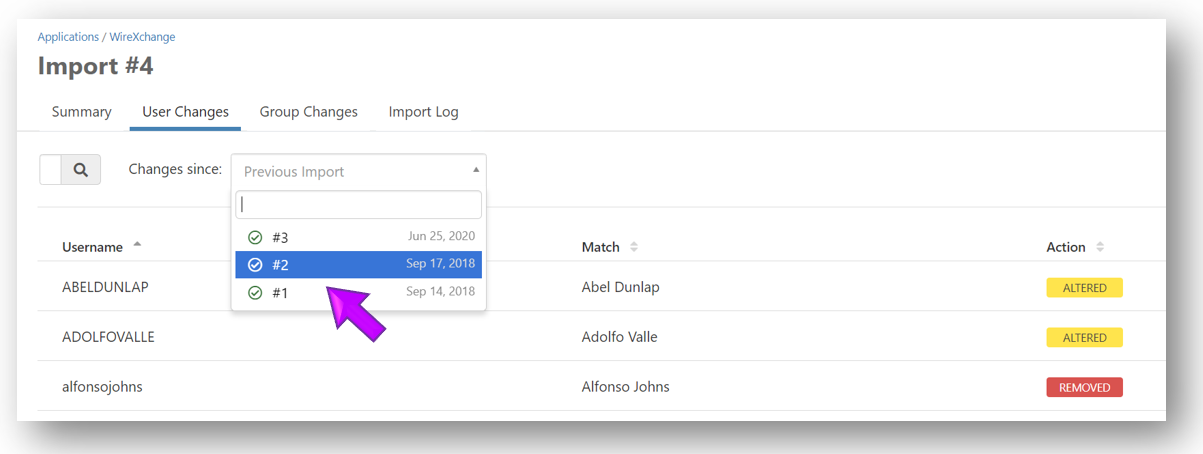
By default, you'll see the changes that have occurred as of the previous import. To see changes compared to a different import:
-
Select the Previous Import field and then select the import you'd like to use as a comparison (see image below).
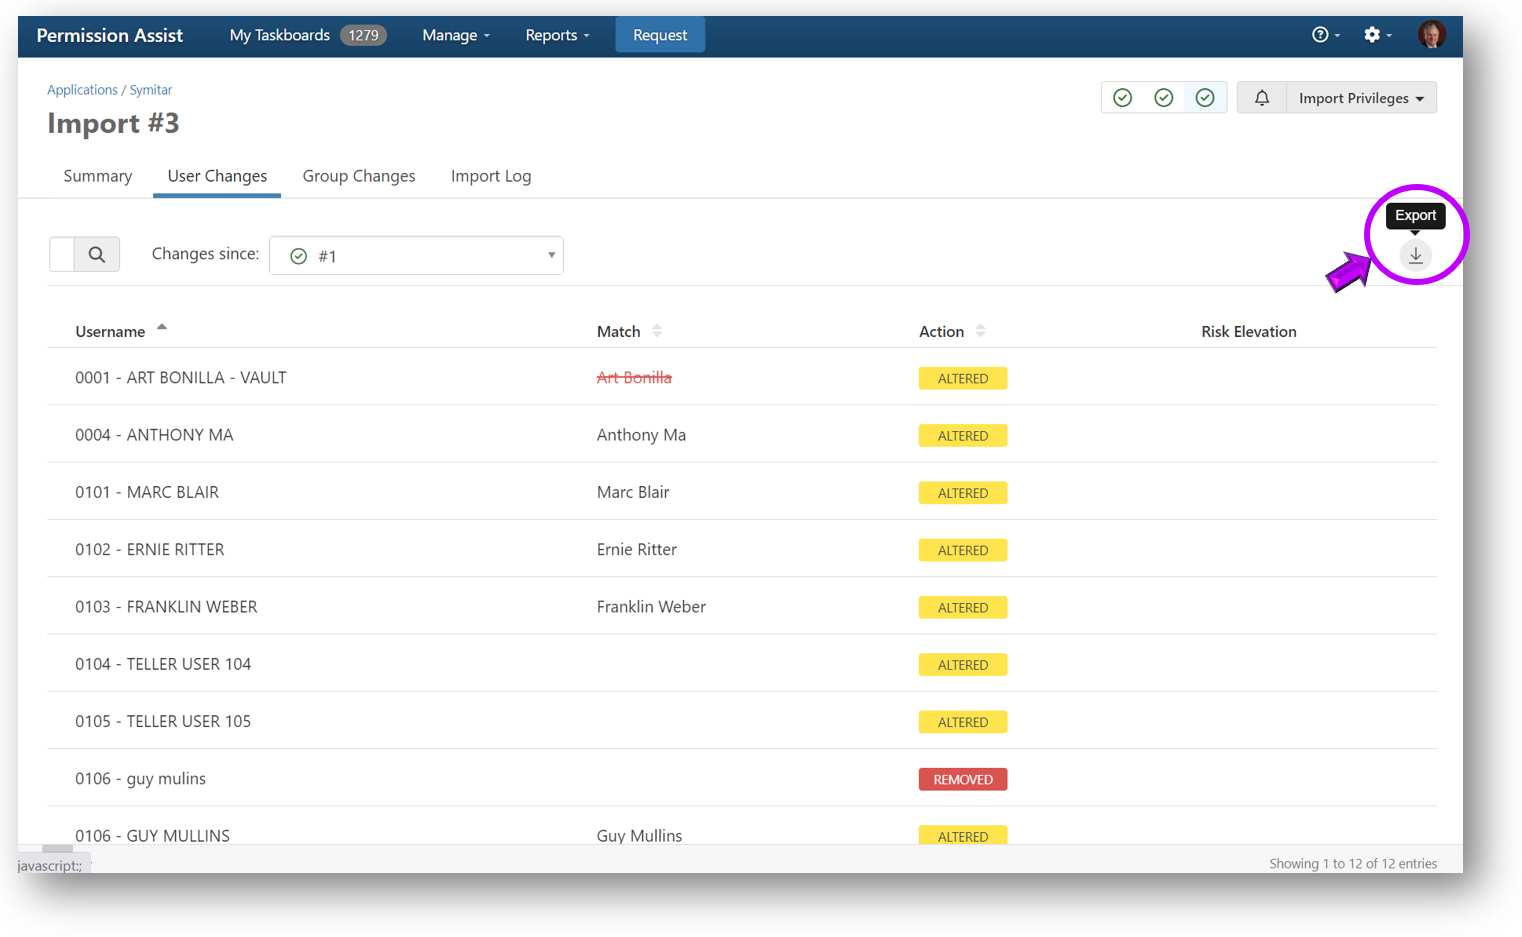
Exporting User Changes Data
User changes data can be exported in either Excel or PDF format. To export the data:
-
Select the Export button in the upper right corner of the tab (see picture below). The Save As window appears, allowing you to save the file to the location of your choice.
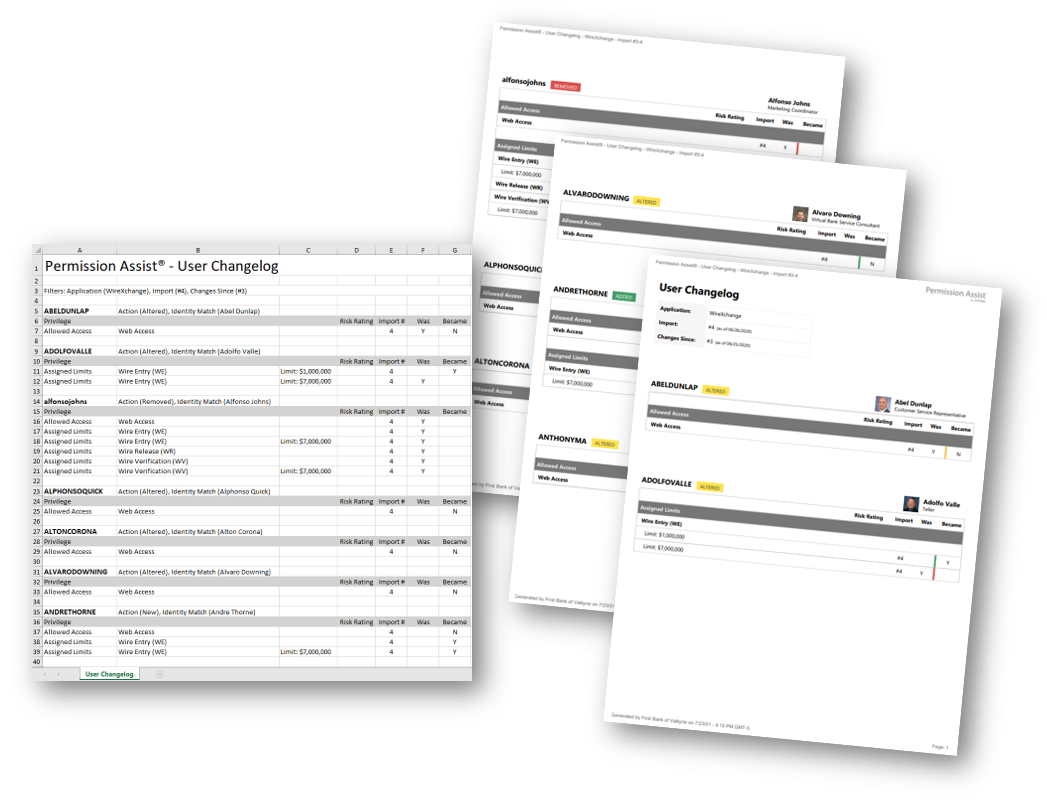
Sample Reports:
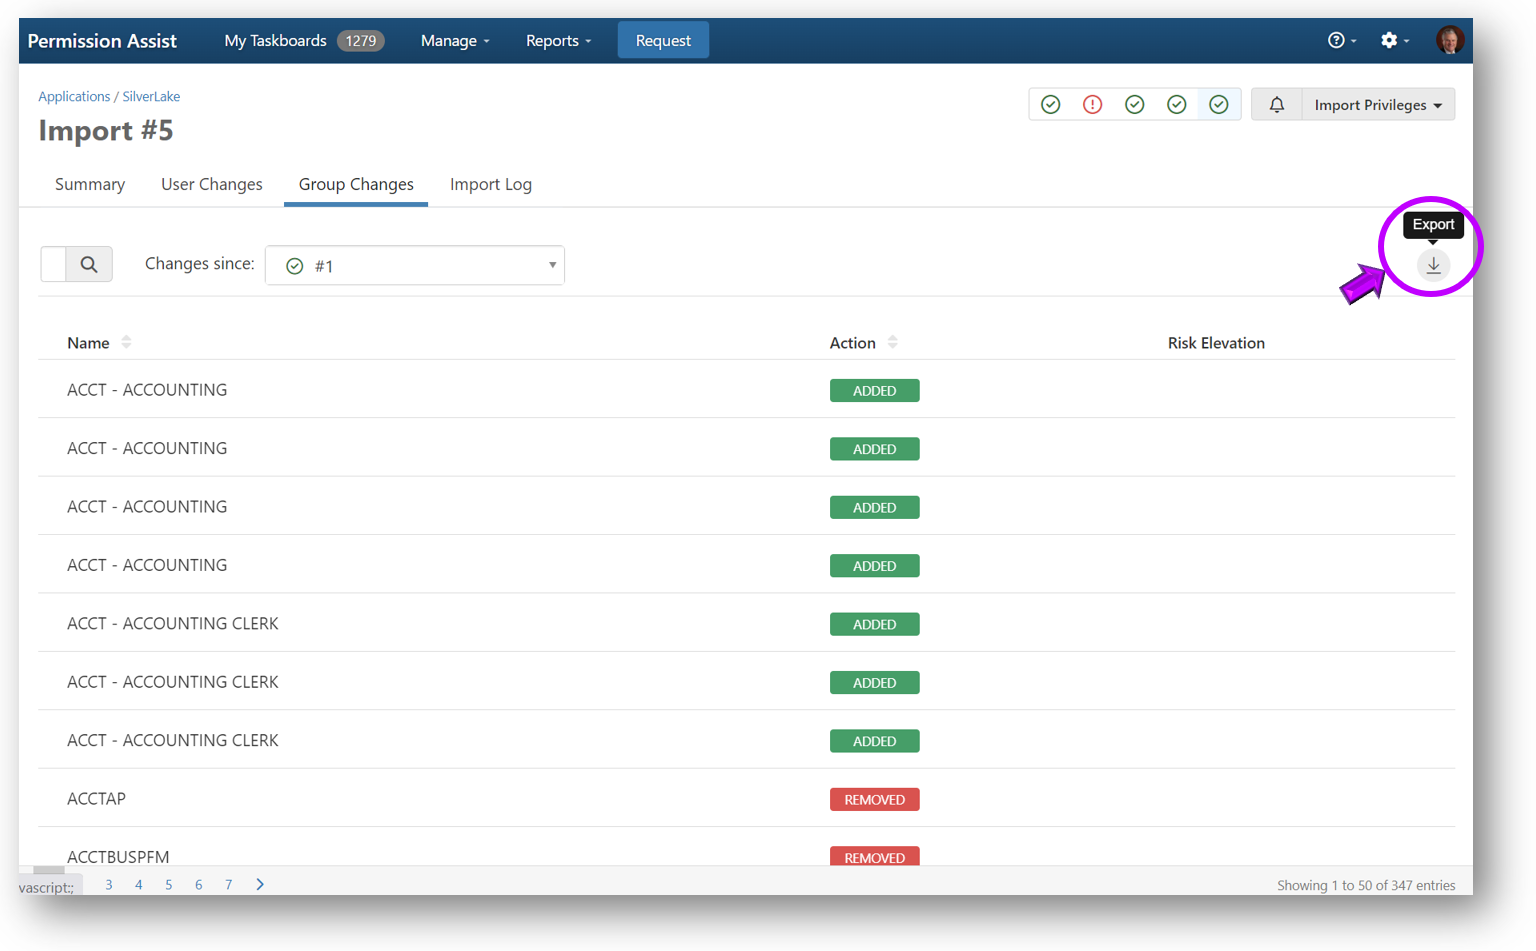
View the Groups Changelog (Group Changes Tab)
The Group Changes tab allows you to see a list of all groups that have been added or changed as a result of new data being imported. If you've assigned risk ratings to permissions within the application, the Risk Elevation column indicates whether the import resulted in privilege changes that elevated risk.
To see a detailed view of the group's privileges as compared to a previous import, select the group within the list (see picture below). The details panel displays the group's privileges before the import (the Was column) and after the import (the column with the import number).
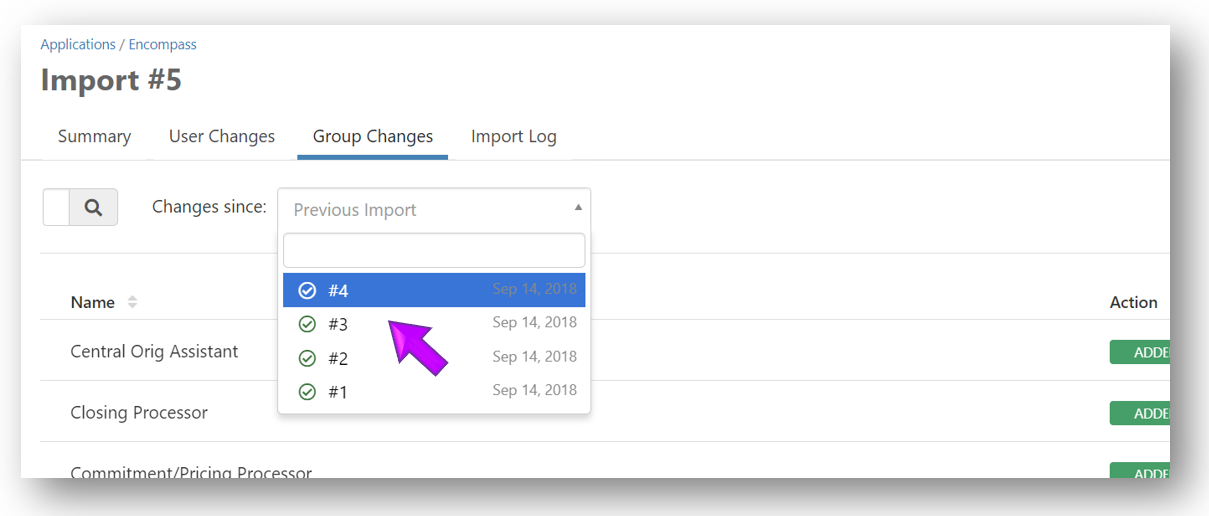
By default, you'll see the changes that have occurred as of the previous import. To see changes compared to a different import:
-
Select the Previous Import field and then select the import you'd like to use as a comparison (see image below).
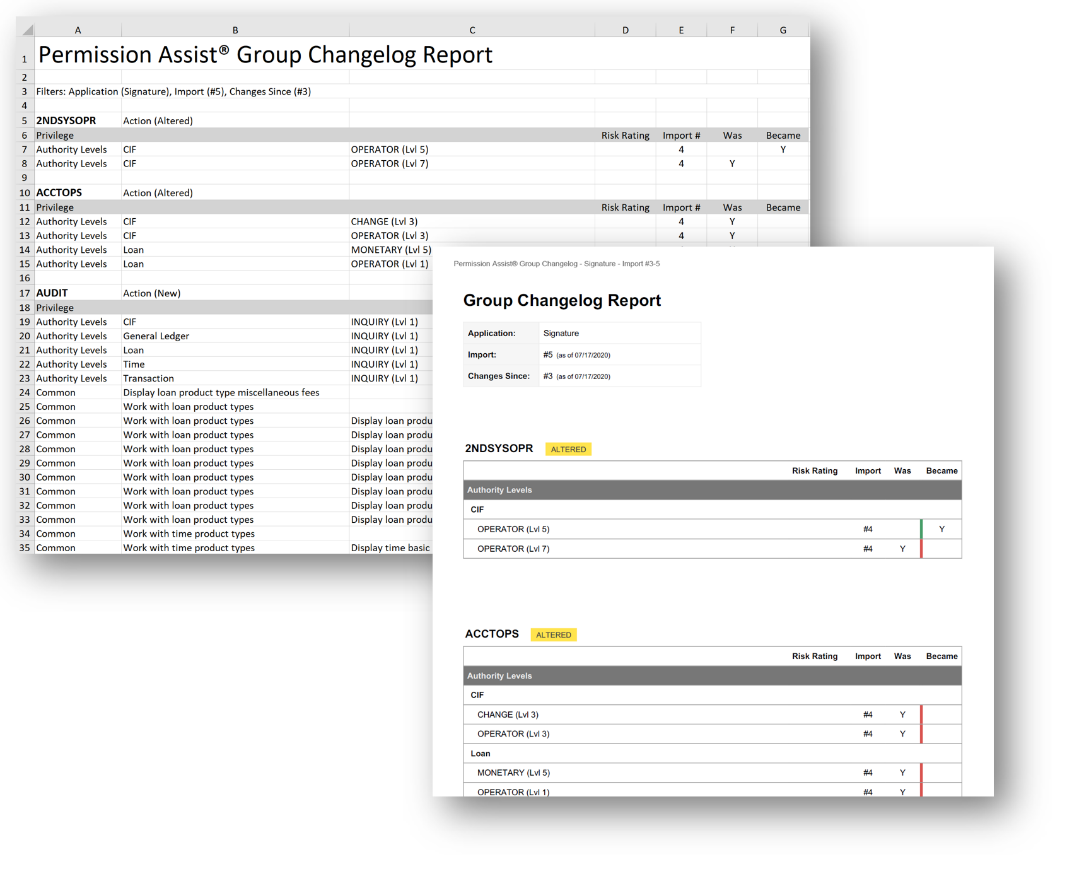
Exporting Groups Changelog Data
Group changes data can be exported in either Excel or PDF format.
To export the data:
-
Select the Export button in the upper right corner of the tab (see picture below). The Save As window appears, allowing you to save the file to the location of your choice.
Sample Reports:
View the Import Log
The Import Log tab page allows you to see system events that are logged during the import. In the event an error occurs during an import, this log can help you see what happened so the issue can be corrected.
Need help solving the problem? Just follow the step-by-step instructions to create an encrypted diagnostic file and send it to our support team using our secure support portal. Your support issues are our top priority so we'll get on it as soon as possible!
Create an Encrypted Diagnostic File and Send Securely to Continuous
In the event an error occurs during an import, a message is displayed similar to the following:
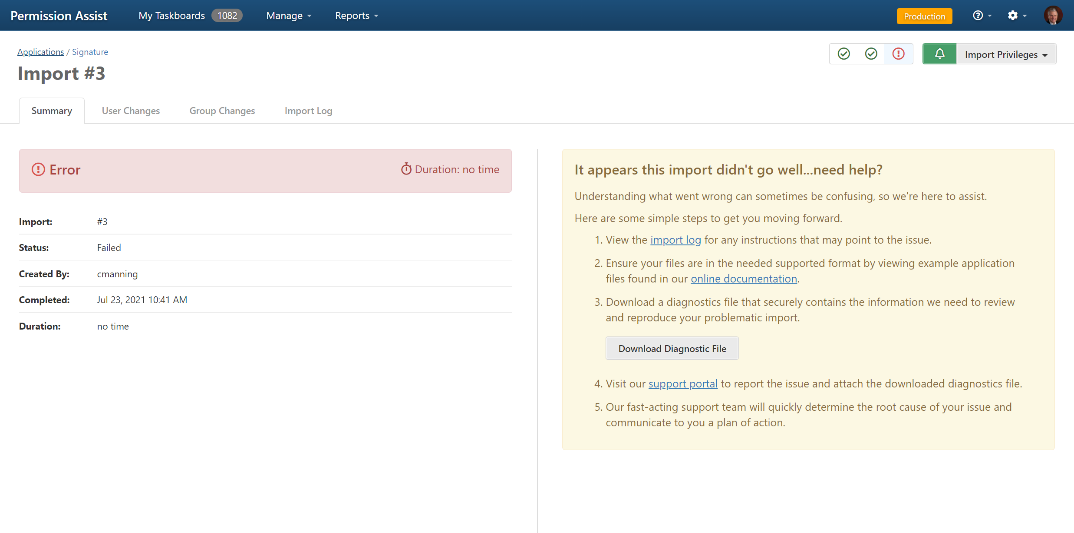
If you are unable to determine what's going wrong by looking at the import log, we're here to help! In these situations, it's likely that our Continuous support staff will ask you to send an encrypted diagnostic file securely through our support portal. To safely and securely send this file, complete the following steps:
NOTE: Although this file is secured, it does contain detailed information that is required to simulate portions of your environment in times of need and should be handled appropriately. Do not create this file unless instructed by Continuous support staff and never send this file via email.
-
Select the Download Diagnostic File button (under step 3 within the "It appears this import didn't go well... need help?" message). The diagnostic file is created and the Save As window is displayed.
-
Save the file to a location that is easy to remember.
-
Select the support portal link (under step 4 within the "It appears this import didn't go well... need help?" message). The Continuous website - All Hands On Deck! page opens.
-
Select the Support Portal button.
-
Select Report a Problem. Enter the form information, making sure to attach the diagnostic file and then select Create. A support ticket is created and the file is securely sent to our Continuous support team.
-
Delete the diagnostic file from the location it was saved in step 2, and then let us take it from here. Your support issues are our top priority so we'll get on it as soon as possible!